Tuesday, March 17, 2009

Chicken Cordon Bleu

Well as a few of you know, I'm going back to basics with my culinary escapades. A wise man once said, "you can't build a house without a foundation". My biggest reason for doing this is I need to find some way to cook classic 2 serving dishes in as little as 30 to 45 minutes. Since I've been working extra hours, studying, walking 3 miles, and working out, it's pretty hard to get too fancy. So... What have I been cooking? Last week I made Chicken Cordon Bleu and a mixed greens salad with balsamic vinaigrette. Nothing says cool winter night like crispy breaded chicken, warm oozing cheese, and sweet sweet ham. That's right ladies, I said ham. You might be saying.. Isn't this hard to make? Doesn't it take a lot of time? So how do you do it? Well I'm gonna tell ya.

  • 4 Skinless/Boneless Chicken Breasts
  • 8 Slices of Deli Counter Swiss Cheese
  • 8 Slices of Deli Counter Cooked Ham
  • 1 Box of Panko Japanese Bread Crumbs
  • 2 Eggs
  • All-Purpose Flour
  • Salt (always kosher or course)
  • Freshly Ground Black Pepper
  • 2 Pieces of Plastic Wrap
  • 3 Small, Shallow Bowls
  • 1 Non-Stick Baking Sheet
  • 1 BLUNT OBJECT

Pre-heat your oven for 350 degrees. Lay one chicken breast between the sheets of plastic wrap. Gently pound out the chicken breast evenly with the blunt object of your choosing. You want the breast to be about 1/4 inch thick. Repeat this process with the remaining chicken breasts. Add two slices of ham and two pieces of cheese on top of one breast and roll the chicken breast like a burrito. You want to roll it pretty tightly. You don't want cheese oozing outall over the place.

Now make a little assembly line with your bowls. Add the flour to one bowl. Add the eggs to the second bowl and scramble. Add the panko and mix in the salt and pepper in the third bowl. Cover your chicken rolls in a light coating of flour, then egg, then panko. Place the completed chicken cordon bleu on the baking sheet. Get it...assembly line?

Bake the cordon bleues for about 30 minutes or until chicken is done. So here is what you get to learn from this recipe. You learn about pounding out different meats (insert childish laugh here).

Why do you you pound out the chicken breast? It's easier to roll...hello. Another reason to pound out meat, is so it cooks evenly. If you have a odd shaped piece of meat like a chicken breast, the thin part of the breast cooks faster than thick part. It's also easier to handle. That is why you pound it out evenly. You also learned about how to get a thin and even coating. That is why you used the three bowls. The flour sticks to the moisture of the chicken, the egg sticks to the flour to give the coating some thickness, the panko sticks to the egg to give you that lovely crunch crust. This method is used as a standard coating technique in cooking. You could even use this technique to fry chicken. Why did I use panko? I used panko instead of regular bread crumbs because I like the light and flaky feeling of panko. I learned this from the food network one day. In fact, I think it was for a chicken cordon bleu recipe. Use these techniques to make your own stuffed chicken breasts. I like to use bleu cheese and cranberries for a stuffing. I wouldn't use the bread crumb coating for it though. Maybe I'll come up with something else for my next blog entry.

Curried Chicken Pot Pie


This is also another post from my previous blog.


After watching one of my favorite shows on the Food Network called "Good Eats", I decided to make one of Alton Brown's recipes. The recipe was for a curry chicken pot pie. You can find the recipe at http://www.foodnetwork.com/food/recipes/recipe/0,,FOOD_9936_21192,00.html. I think it was pretty delicious. It had the consistency of a creamy chicken pot pie which I love, with the unique flavor of curry. The recipe was pretty easy to prepare also. It takes a lot of pots, pans, and baking dishes though. So I wouldn't recommend making this on a weekday night.


I used a Tyson's pre-cooked roasted whole chicken for the chicken requirement. The pre-roasted chicken gave the pot pie a sweet flavor with the smokey heat of the curry. Yes I know, this means you need to know how to break down a whole chicken. Don't worry newbies, It's not that hard. Once you get the hang of it, it only takes a few minutes. Make sure that you try to cut the chicken into even chunks. This way it will cook evenly. A mandatory requirement for breaking down a chicken is a VERY sharp chef's knife or a carving knife. If you don't have a sharp knife, you won't be able to cut through the chicken's joints and bones.


If you don't have a good knife, I suggest you get one. A good chef's knife is always good to have in the kitchen. I use a Wüsthof. I paid over $100 for it, and it is worth every penny. This is the model of knife that I use (Grand Prix II Cook's Knife). I like it because it is extremely sharp, keeps a good edge, and made of good stainless steel. It also has a rounded handle for comfort. When you buy a knife that you are going to use a lot, you want it to be comfortable as well as effective. If you buy an expensive knife you want it to be perfect for you and last a long time.Here are few tips to owning an expensive knife, or any knife.


  • Don't put your knives in the dishwasher. The dishwasher cuts life off of your knife.

  • Sharpen your knives annually. Use a professional to sharpen your knives. Don't do it yourself! You can seriously damage your knife permanently.

  • Don't use those stupid machines either.

  • Use a honing steel every time you use your knife. Using the honing steel helps "reset" the blade's edge. What's a honing steel? Click Here

Anyway, back to the recipe. I used frozen Peppridge Farm puffed pastry. I worked pretty well, it didn't rise or "puff" quite as much as I would have liked to see, but it works in a pinch. I might try to make my own dough the next time. I wish I had one of those nice standup mixers.


Here are some of the things I would change in the recipe:
Add more curry
Make more of the cream sauce.
More chicken.

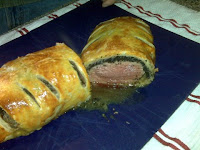
Gordon Ramsay's Beef Wellington

After watching quite a bit of BBC America, I found another show called "The F Word". The show is basically a talk show with cooking thrown into the mix. Gordon talks with British celebrities, new food trends, and shows simple; straight forward instructions to make a few of his better known recipes. He also challenges some of the celebrities on the show to cooking contests. Which oddly enough, he loses quite a bit of the challenges.

Well, while watching the show one day he showed how to make his Beef Wellington recipe.


I've made this recipe a couple of times, and both times it came out great. Here was the final result.

Pork Tenderloin with a Mustard-Tarragon Sauce

This is a post from my old blog. I made this dish again a couple of days ago with the same wonderful results.

Roasted Pork Tenderloin with a Mustard-Tarragon Sauce


Fresh Pancetta Green Beans


Scallion and Parmesan Cheese Mashed Potatoes (see recipe below)


Devil's Food Chocolate Cake with Bittersweet Chocolate Icing


Wine:
Mezza Corona Pinot Grigio
Woodbridge Riesling


The pork came out great. It was very tender and moist. I marinated the pork for one hour before roasting it. For the white wine that the recipe called for, I used a $10.00 bottle of 2005 Woodbridge Riesling.

I'm not a big fan of the licorice taste of Tarragon, but the dijon mustard, butter, and cream definitely balanced it out. The sauce was very creamy and complemented the pork very well. Just remember not to over sauce! A sauce is supposed to complement the meat, not the other way around.

The pancetta green beans were also very tasty. I love pancetta. You might be asking yourself, "what is pancetta"? First off, it's pronounced "pan-cheh-tah". Pancetta is italian bacon that hasn't been smoked, so it has a salty flavor. It's used a lot to compliment vegetables like asparagus and green beans, or to flavor sauces. You can find pancetta behind the deli counter at your supermarket or at the butcher.

In this recipe, it asks you to do the following:
"Cook beans in large pot of boiling salted water until crisp-tender, about 4 minutes. Drain. Transfer to bowl of ice water; cool 5 minutes."

The method above is also known as "blanching". Blanching is done to stop the cooking process and firm up the flesh of the vegetable. Blanching also brings out the color of the vegetable. Notice in the picture above how green the green beans are?

Next... the potatoes. It's amazing to me that people still don't know how to cook mashed potatoes, or intimidated to cook them. Granted, they are always the first to go at family dinners, and a chunky, dry batch of mashed potatoes can turn your name into Mud with family and friends.

So here's how you make my Scallion and Parmesan Cheese Mashed Potatoes:

2 Lbs. Yukon Gold Potatoes
4-8 Tablespoons of Unsalted Butter, divided
Heavy Cream
Freshly Grated Parmesan Cheese
Fresh Scallions (AKA Green Onions)
Salt and Pepper

Special Equipment:
Potato Masher (DUH!)

Wash and peel the potatoes. Cut the potatoes into large chunks. Make sure that the potato chunks are around the same size. This will make sure that all of the potatoes are done at the same time. Put the potatoes in a large pot, like a dutch oven. Fill the pot with cold water just to cover the potatoes about an inch. Salt the water.

Boil the potatoes for about 10 minutes, check to see if the potatoes are done by taking a sharp knife and stabbing a large potato chuck. If the chunk feels tough to penetrate, then the potatoes aren't done. If you are able pierce the potato, and the potato won't slide off the knife, then the potatoes aren't done. While the potatoes are cooking, thinly slice the scallions. I only use the green part.

Once the potatoes are done, drain them and put them right back in the same pot that you cooked them in on medium-low heat. We do this to cook out any water that might be left. You don't want runny mashed potatoes do you? You only need to do this for 20-30 seconds. Keep stirring. Don't fry or burn the potatoes! Turn the heat down to low. In small doses, start mashing the cream and butter into the potatoes.

Remember to taste what you are doing. Remember; you can always add more, but you can't take it away once it's in your dish. Then you're cooked!! Get it!! You're cooked!, eh

Once your potatoes are at the right consistency and taste, then start adding scallions and cheese in small doses. Season with salt and pepper.

That's it! That wasn't so hard was it?

The Chocolate Devil's Food Cake was just out of a box. But I did make the icing for it.

So dinner was a big hit. I used every pot and pan in my kitchen's arsenal. So I made a simple gourmet dinner for under $100.00 total (wine and ingredients), and I had three days worth of leftovers. I kick ass!